This guide will show you how to use the new Targeted File Transfer System in Ventrilo.
This new system allows you to upload files to "User Folders" on the server, and select users to Send Files to.
This new system allows you to upload files to "User Folders" on the server, and select users to Send Files to.
-
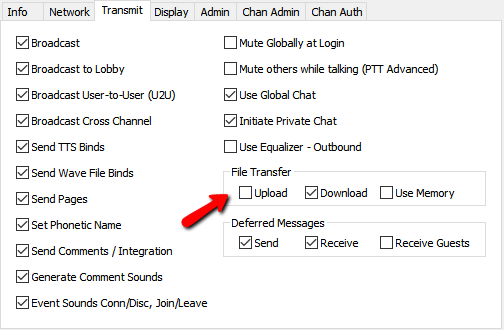
You can only Transfer/Upload files if you have a User in the User Editor, with the Correct File Transfer Permissions, on the VentriloPro Server. Below you can see the exact Permissions under the "Transmit" Tab to allow for File Transfers.
If you do not know how to make a user in the User Editor, please view this guide here.
-
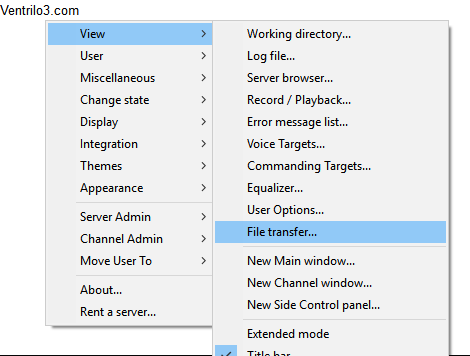
To access the File Transfer area, please right click in the White Area of the Ventrilo Client, then go to "View" > "File Transfer".
-
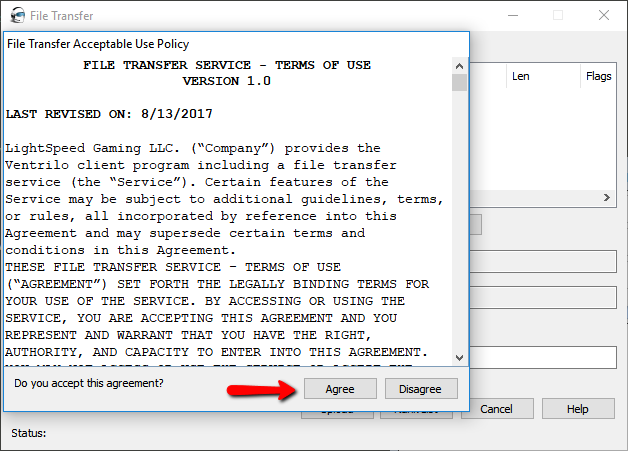
You must agree to the File Transfer Agreement from LightSpeed Gaming LLC to use the File Transfer System.
-
The File Transfer System has many options to allow sending of files.
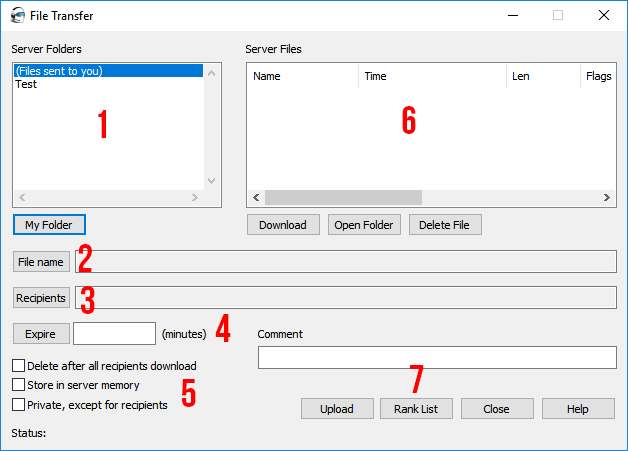
The areas in the above screenshot is as follows:- This area is devoted to the User Folders on the server. If you select a User you can see the files they have uploaded to the server, as long as they have not made them private.
- You can select a file from this area, which will browse your local PC to choose a file.
- This field is Optional. If you select a Recipient or Rank it will appear here. The next time that user joins or if that user is connected, they will receive a message that they have a new file available to download.
- This field is Optional. If you select an expiry time, the file will only be available until that time has passed, then it will no longer be available.
- These fields are Optional.
- "Delete after all recipients download" will delete the file after all designated users in the Recipients Field download the file.
- "Store in server memory" will write the file to the Server Memory which allows for 10MB's of use. Please note that if the server were to restart, any files loaded in Memory would be lost.
- "Private, except for recipients" will make the file Private to all users in the File Transfer window, unless they are listed as a recipient for the file transfer.
- This area is devoted to the Files in each Users Folder on the server. To view your own files, please click on "My Folder" on the left side of the window. To download a file from this area, click on the file and click "Download".
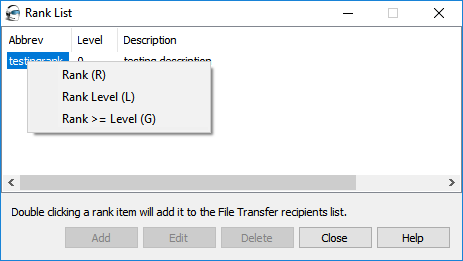
- You can select a Rank as the recipient of your file transfer, or certain rank levels.
-
Once you have selected all the settings you wish, you can click on "Upload" and it will upload the file to the server to Transmit to users if you have selected it.
|
Links
|
Other Services
|
Account
|


|
© 2004-2026 LightSpeed Gaming LLC